Resectioning Image Stacks with MAPPaint
Useful Unix Commands
- ls - lists the files in current directory
- cd smpldirectory - goes to specific directory
- cd .. - goes back one directory
- rm smplefile - deletes file
- rm *.filetype - removes files of all of the file type
specified
- cp smplefile smpledirectory - copies file to a directory
- Up arrow - Shows what command was entered previously
Converting OpenLab File or Tiff Images to Wlz Volume
- Save Openlab file as multiple tiff files. Make sure they are numbered sequentially
with 3 to 4 significant digits depending on number of layers. *Make sure the tif
images are 8 bit greyscale ( Can check in Adobe Photoshop) ** Make sure they have
.tif extension can be added in OpenLab under "Naming" in save as multiple.
- Set the working directory in a terminal window to the folder containing the tif
images. (See "Useful Unix Commands" for common commands)
- Type "/opt/MouseAtlas/bin/MakeVolume" and press enter. This will create a volume
from all the tiff images in the present directory and name it "vol.wlz".
- Open up MAPaint
- Open Reference command and open up the wlz volume created
- Open up volume by hitting x-y view command under view toolbar
- Zoom window and hit controls button on lower left hand corner
- Can type in degree shift or can drag bar - adjust until optimal pitch and yaw is
obtained
- Record desired pitch and yaw values
Resection
- Set the working directory in a terminal window to the folder containing the volume
"vol.wlz"
- Type "/opt/MouseAtlas/bin/Resection" and press enter. Enter desired pitch and yaw
when prompted, pressing enter after each. This command will create a folder named
"p(pitch)y(yaw)" containing resectioned tif images at the specified pitch and yaw.
Scale Resectioned Images (Optional)
- Open a series of tiff images resectioned at either p90 or p90y90 using the "Open
Multiple" command in Openlab
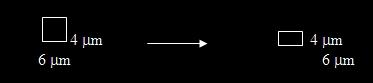
- Compare the calibration information of the original magnification with the section
thickness to determine whether to shrink the x- or y-dimension. For example, a sample
sectioned at 4 um using a magnification of 17.559x (corresponding to 6.0um per pixel),
then resectioned at an orthogonal plane has pixels corresponding to 6 um by 4 um
in the x- and y-dimensions, respectively. It therefore needs to be shrunk in the
y-dimension to achieve equal scales.
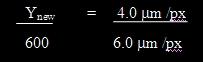
- Calculate the new image size in the dimension being changed from the initial image
size and relative pixel sizes. For example, from the example above, if the initial
y-dimension is 600 pixels, it would be scaled as follows:
- The image dimension can be viewed and changed from the "Document Size" option under
the Image Menu option in Openlab. Scale the image to the new size.